간단한 자바 소켓 프로그래밍
서론
이 글은 http://0pen.us 에 제가 썼던 글을 재구성하여 작성한 것입니다.
코드
먼저 간단한 예제를 보여드리겠습니다. 프로그램은 크게 두 부분으로 나뉩니다. 하나는 일을 간단하게 처리할 수 있도록 만들어놓은 래핑(wrapping) 클래스이고, 다른 하나는 그것을 이용하는 메인 클래스입니다.
래핑 클래스
/*
 * Worker.java
 *
 * Created on May 23, 2006, 10:36 AM
 *
 * To change this template, choose Tools | Template Manager
 * and open the template in the editor.
 */

package app;

import java.io.BufferedInputStream;
import java.io.BufferedOutputStream;
import java.io.IOException;
import java.net.InetAddress;
import java.net.Socket;
import java.net.UnknownHostException;

/**
 *
 * @author superwtk
 */
public class Worker {

	private Socket socket;
	private BufferedInputStream bis;
	private BufferedOutputStream bos;

	/** Creates a new instance of Worker */
	public Worker() {
		socket = null;
		bis = null;
		bos = null;
	}

	public void connect(String host, int port) throws UnknownHostException, IOException {
		socket = new Socket(InetAddress.getByName(host), port);

		bis = new BufferedInputStream(socket.getInputStream());
		bos = new BufferedOutputStream(socket.getOutputStream());
	}

	public void connect(String host, int port, int localPort) throws UnknownHostException, IOException {
		socket = new Socket(InetAddress.getByName(host), port, InetAddress.getLocalHost(), localPort);
	}

	public void sendMessage(String message) throws IOException {
		bos.write(message.getBytes());
		bos.flush();
	}

	public String receiveMessage() throws IOException {
		byte[] buf = new byte[4096];
		StringBuffer strbuf = new StringBuffer(4096);

		int read = 0;
		while((read = bis.read(buf)) > 0) {
			strbuf.append(new String(buf, 0, read));
		}

		return new String(strbuf);
	}

	public void disconnect() throws IOException {
		bis.close();
		bos.close();
		socket.close();
	}

}
메인 클래스
/*
 * Main.java
 *
 * Created on May 23, 2006, 10:35 AM
 *
 * To change this template, choose Tools | Template Manager
 * and open the template in the editor.
 */

package app;

/**
 *
 * @author superwtk
 */
public class Main {

	/** Creates a new instance of Main */
	public Main() {
	}

	/**
	 * @param args the command line arguments
	 */
	public static void main(String[] args) {
		try {
			Worker w = new Worker();
			w.connect("0pen.us", 80);

			StringBuffer message = new StringBuffer();
			message.append("GET /Forum/ HTTP/1.1\r\n");
			message.append("Host: 0pen.us\r\n");
			message.append("\r\n");

			w.sendMessage(new String(message));
			System.out.println(w.receiveMessage());

			w.disconnect();
		}
		catch(Exception e) {
			e.printStackTrace();
		}
	}

}
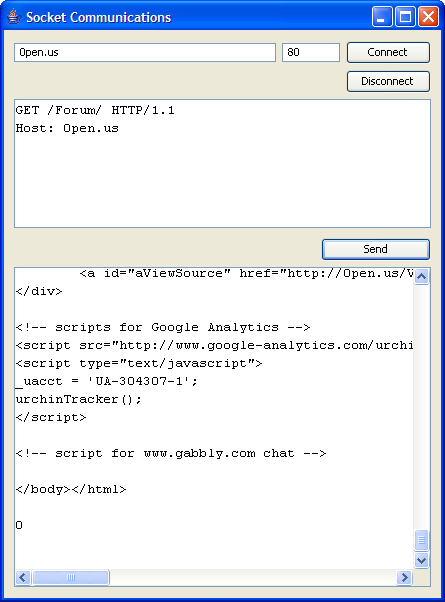
결과
http://0pne.us/Forum/ 의 HTML 코드가 출력됩니다.
GUI Version
그런데 스트림은 왜 쓰는것일까요?
자바에서 소켓을 이용한 통신은 일반적으로
- 소켓을 생성
- 연결 확립
- Input/Output 스트림 얻어오기
- 스트림을 통해서 데이터 주고 받기
- 스트림 닫기, 소켓 닫기
와 같은 순서로 이루어집니다.
Socket s = new Socket( /*생략*/ );
InputStream is = s.getInputStream();
OutputStream os = s.getOutputStream();

byte[] buf = new byte[1024];
is.read(buf);
os.write("hooray~".getBytes());

is.close()
os.close();
s.close();
물론 필요에 따라 순서를 바꿀 수도 있습니다. 그럼 소켓을 이용해서 직접 데이터를 주고받는 편한 방법을 놔두고 자바 소켓은 굳이 스트림을 이용해서 통신을 할까요?
Socket s = new Socket( /*생략*/ );

byte[] buf = new byte[1024];
s.recv(buf);
s.send("hooray~".getBytes());

s.close();
스트림을 쓰지 않고 위와 같이 하면 좋을텐데 말입니다. 이건 유닉스나, 유닉스 구성하는 대부분의 소프트웨어를 만들어낸 C언어에서 가져온 개념이라고 생각됩니다.
유닉스에서는 모든 것이 파일로 표현됩니다. 일반적으로 말하는 (디스크 상의) 파일도 파일이고, 키보드, 마우스, 프린터, 스캐너 등 각종 디바이스들도 파일로 표현됩니다. 해당 파일에 뭔가를 쓰면 그 파일로 데이터가 출력됩니다. 예를 들면, 프린터를 나타내는 파일에 데이터를 쓰면 프린터로 해당 데이터가 출력되는 식입니다. 물론 마우스나 키보드를 나타내는 파일에 데이터를 쓸 수는 없겠지요.
stdio.h 에는 다음과 같은 함수가 있습니다.
ssize_t write(int fildes, const void *buf, size_t nbyte);
이 함수를 이용하면 어디든지 원하는 곳에 원하는 데이터를 쓸 수가 있습니다. 예를 들어서,
write(fileno(stdout), "I'm your father\n", 16);
와 같이 하면 stdout (표준출력) 을 통해서 해당 데이터를 출력합니다. 이번엔 로컬 디스크에 파일을 작성해보겠습니다.
FILE* file = fopen("output.txt", "w");
write(fileno(file), "I'm your father", 16);
이번엔 소켓을 이용해서 데이터를 출력(네트워크를 통해서 송출)해보겠습니다.
int sock = socket(AF_INET, SOCK_STREAM, 0);
//...(생략)
write(sock, "I'm your father", 16);
write 함수의 코드는 (거의) 똑같습니다. 하지만 완전히 다른 일을 하게 되죠. 하나는 표준입출력을 통해서 데이터를 출력하고, 다른 하나는 로컬 디스크에 출력을 하게 되고, 또 다른 하나는 네트워크를 통해서 데이터를 보내게 됩니다.
| 자바의 스트림도 이와 비슷한 개념입니다. FileInputStream, FileOutputStream, DataInputStream, DataOutputStream, BufferedInputStream, BufferedOutputStream, CipherInputStream, CipherOutputStream 등 수많은 클래스의 부모 클래스가 되는 InputStream 과 OutpuStream 클래스가 있습니다. 일반적인 경우, InputStream 의 read() 메소드와 OutputStream 의 write() 메소드만 있으면 입출력하는데 부족함이 없습니다. 수많은 종류의 스트림들은 이 부모 스트림들을 확장해서 특수한 목적에 사용되도록 특수한 성질을 부여한 스트림입니다. 예를 들어, Buffered{Input | Output}Stream 은 내부적으로 적절한 버퍼링을 하여 입출력을 효율적으로 하도록 도와줍니다. Cipher{Input | Output}Stream 은 객체 암호문을 쉽고 편하게 입출력 하도록 도와줍니다. |
그럼 자바에서 유닉스의 파일 디스크립터와 같은 역할을 하는것은 무엇일까요. 각각의 InputStream 과 OutputStream 의 인스턴스들입니다. System.out 은 C의 stdout 이라고 봐도 무방할듯 합니다. 자바를 한번이라도 접해본 사람은 다음과 같은 코드를 본 적이 있을것입니다.
System.out.println("Hello World!");
이것은 다음의 코드와 같은 효과를 가집니다.
PrintStream ps = System.out;
ps.println("Hello World!");
물론 다음과 같은 코드도 가능합니다.
OutputStream os = System.out;
os.write("I'm your father".getBytes());
System.out 의 out 은 java.io.PrintStream 의 인스턴스로, java.lang.System 클래스에 static 멤버로 선언되어 있습니다. 만약 로컬 디스크에 파일을 쓰고 싶으면 다음과 같이 하면 됩니다.
OutputStream os = new FileOutputStream(new File("output.txt"));
os.write("I'm your father".getBytes());
네트워크를 통해서 내보내고 싶다면 다음과 같이 하면 되겠죠.
Socket socket = new Socket(InetAddress.getByName("somewhere"), port);
OutputStream os = socket.getOutputStream();
os.write("I'm your father".getBytes());
각 에제의 os.write() 코드는 완전히 똑같지만, 완전히 다른 결과를 가져옵니다. 스트림을 잘 이용하면 인생이 편해집니다.